
0. 들어가며…
- Vue 3의
<script setup>은 컴포넌트 코드를 간결하게 만들어주고, 보일러플레이트 코드를 크게 줄여주었다. 하지만 개발자마다 선언 순서를 달리할 수 있어, 코드의 일관성이 떨어지고 가독성이 저하되는 문제가 발생했다. 특히 여러 선언이 섞여 있는 경우, 이 현상이 두드러졌다. - 또한 코드리뷰에서 이 순서와 선언을 그룹으로 모으는 코멘트가 있었다. 그렇다 보니 코드리뷰에서 기술적인 논의보다는 포매팅 체크가 다수일 때가 있었다.
- 팀이 기술적인 코드 리뷰에 집중하도록 선언 순서를 정렬해주는 기능이 필요했다. 하지만 ESLint 룰 중에
<script setup>의 내부 선언 순서를 조정해주는 룰을 찾기 어려웠다. - 예전에 ESLint 룰을 만들었던 경험을 살려,
<script setup>내부에서 선언 순서를 자동 정렬해주는 룰을 만들게 되었다. - 이번 시간 이 커스텀 룰에 대한 코드와 실제 작동 예시를 보여주고자 한다. 🙂
목차
1. 커스텀 Eslint 룰 소개
1) 룰의 기능 요약
2) 적용 예시 보기
2. 커스텀 ESLint 룰 세부 구현 살펴보기
1) 파일 구조
2) AST 유틸리티 (astUtils.js)
3) AST 유틸리티 (orderUtils.js)
4) 메인 함수(rules/declaration-order.js)
3. 마치며
1. 커스텀 ESLint 룰 소개
1) 룰의 기능 요약
- 해당 커스텀 ESLint 룰은 Vue 3
<script setup>내의 선언 순서를 자동으로 정렬한다. - 지원하는 옵션은
sectionOrder와lifecycleOrder가 있다.
(1) 지원하는 첫 번째 옵션, sectionOrder
sectionOrder은 선언 그룹의 순서를 정의하는 옵션이다.- 기본 선언 순서는 아래와 같으며, 배열의 요소 순서가 곧 그룹의 순서가 된다.
/* 기본 선언 순서 */

[
  "type",         // 타입 선언
  "defineProps",  // props 선언
  "defineEmits",  // emit 선언
  "defineSlots",  // slot 선언
  "defineModel",  // model 선언
  "defineOptions",// option 선언
  "class",        // 클래스 선언
  "plainVars",    // 비반응형 변수
  "reactiveVars", // ref, reactive 등 반응형 변수
  "composables",  // useXXX 형식의 컴포저블 함수
  "computed",     // 컴퓨티드
  "watchers",     // 와치
  "lifecycle",    // 생명주기(onMounted, onBeforeUnmount 등)
  "unknowns",     // 함수 호출, 변수 재할당 등
  "functions"     // const, function 함수
  "defineExpose", // 외부로 방출할 인터페이스 선언
]- ESLint 룰을 적용되면,
<script setup>내의 선언은 아래와 같이 정렬된다.
/* type 선언: 타입 정의 */
type MyType = { id: number; name: string };

/* defineProps 선언: props 선언 */
const props = defineProps<{ title: string }>();

/* defineEmits 선언: emit 선언 */
const emits = defineEmits<{
  (e: "click", payload: number): void;
}>();

/* defineSlots 선언: slot 선언 */
const slots = defineSlots();

/* class 선언: 클래스 선언 */
class MyClass {
  constructor(public value: number) {}
  print() {
    console.log(this.value);
  }
}

/* plainVars 선언: 비반응형 변수 */
const nonReactiveVar = "Hello World";

/* reactiveVars 선언: ref, reactive 등 반응형 변수 */
const count = ref(0);
const state = reactive({ message: "Hello" });

/* composables 선언: useXXX 형식의 컴포저블 함수 */
const { data } = useCustomHook();

/* computed 선언: 컴퓨티드 */
const doubleCount = computed(() => count.value * 2);

/* watchers 선언: 와치 */
watch(count, (newVal) => {
  console.log("Count changed:", newVal);
});

/* lifecycle 선언: 생명주기(onMounted, onBeforeUnmount 등) */
onMounted(() => {
  console.log("Component mounted");
});
onBeforeUnmount(() => {
  console.log("Component will unmount");
});

/* unknowns 선언: 함수 호출 등 */
console.log("This is an unknown declaration");
someFunctionCall();

/* functions 선언: const, function 함수 */
const greet = () => {
  console.log("Hello!");
};
function handleClick() {
  emits("click", 42);
}- 또한 그룹 간에 단 띄어쓰기가 적용되어 시각적 구분이 가능하다.
/* eslint 적용 전 */

type MyType = { id: number; name: string };
type MyType2 = { id: number; name: string };
const props = defineProps<{ title: string }>();
const emits = defineEmits<{
  (e: "click", payload: number): void;
}>();
/* eslint 적용 후 */
type MyType = { id: number; name: string };
type MyType2 = { id: number; name: string };
const props = defineProps<{ title: string }>();
const emits = defineEmits<{
(e: "click", payload: number): void;
}>();- 만약
sectionOrder를 수정하고 싶다면, eslint.config.js에서 룰 상세 설정을 수정해보자.
// eslint.config.js

export default [
  {
    files: ["**/*.vue"],
    plugins: { "vue3-script-setup": vueSetupRules },
    rules: {
      "vue3-script-setup/declaration-order": [
        "error",
        { sectionOrder: ["defineProps", "plainVars"] }, /* 이 부분 */
      ],
    },
  },
];
(2) 지원하는 두 번째 옵션, lifecycleOrder
- Vue는 컴포넌트의 생명주기를 제어하는 라이프사이클 훅을 제공하며, 실행 순서가 정해져 있다.
- 하지만
onServerPrefetch및onErrorCaptured는 명확한 순서가 없어, 이를 조정할 수 있도록lifecycleOrder옵션을 추가했다.
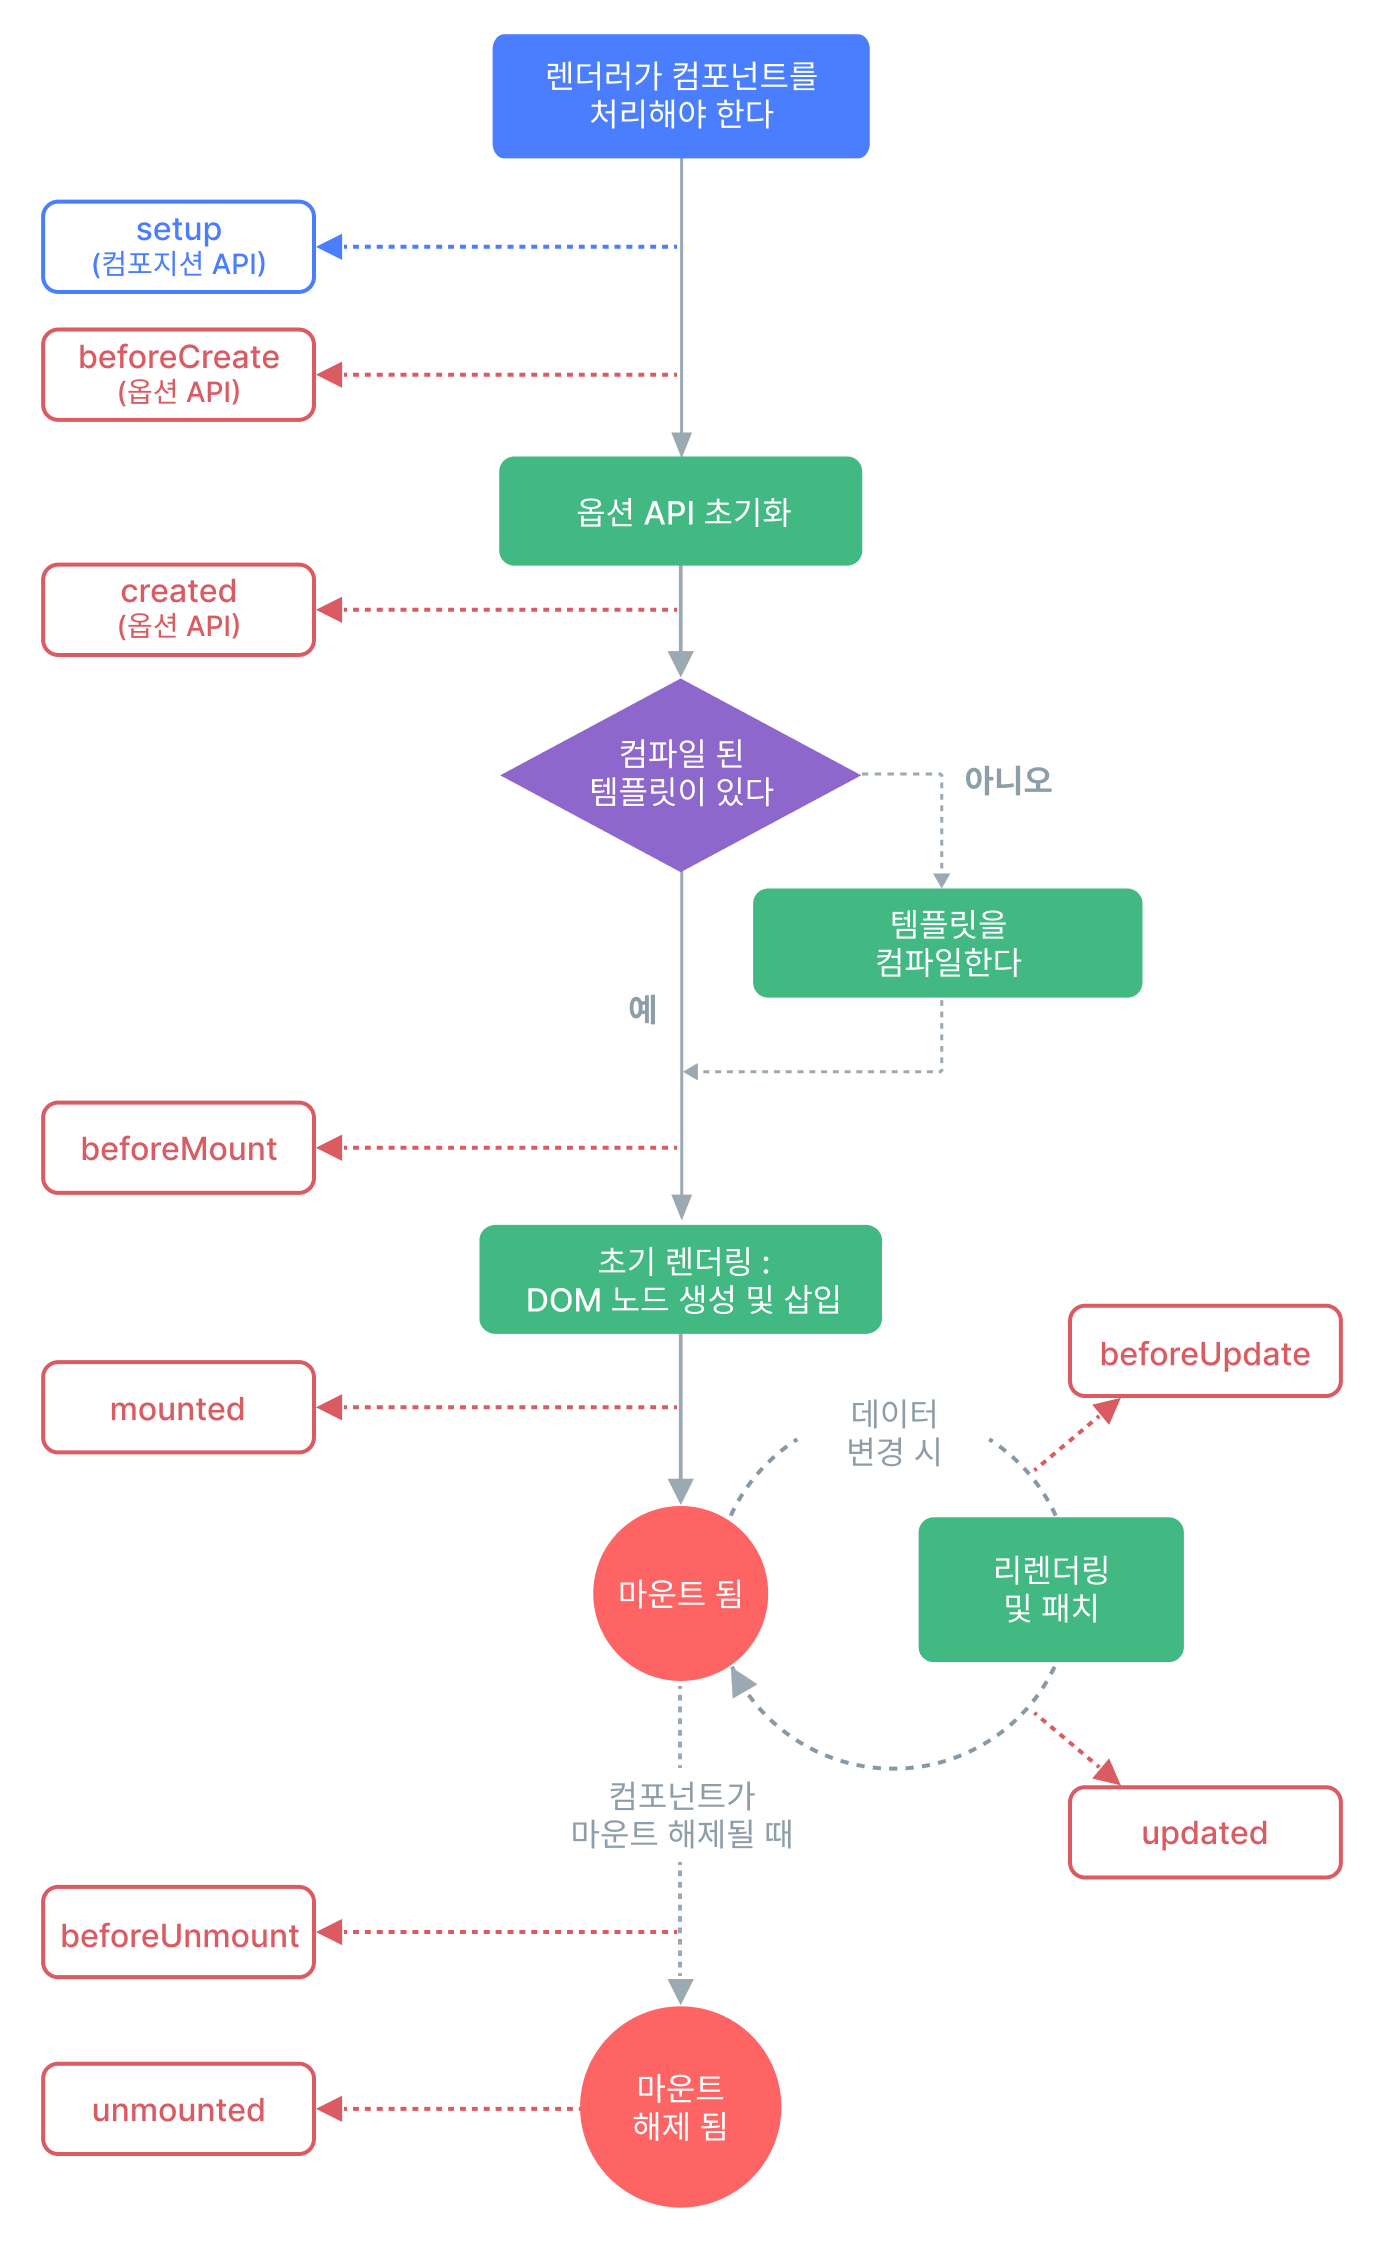
- 이 옵션의 경우, 데이터 형태가 배열이 아닌 객체로 구성된다.
- 그래서 라이프사이클의 순서를 지정한다기 보다는 우선순위를 설정하는 개념이다.
/* lifecycleOrder 옵션 기본 순서 */

onBeforeMount: 0,
onMounted: 1,
onBeforeUpdate: 2,
onUpdated: 3,
onBeforeUnmount: 4,
onUnmounted: 5,
onErrorCaptured: 6,
onRenderTracked: 7,
onRenderTriggered: 8,
onActivated: 9,
onDeactivated: 10,
onServerPrefetch: 11,- 만약 아래와 같이 우선순위(
lifecycleOrder)를 설정하면…
onMounted: 0,
onBeforeMount: 0,
onUpdated: 1
/* eslint 적용 전 */
onBeforeMount(() => { ... });
onUpdated(() => { ... });
onMounted(() => { ... });- 우선순위에 따라 훅이 정렬되는데, 우선 순위 값이 같은 경우 선언 초기 순서로 유지된다.
/* eslint 적용 후 */

onBeforeMount(() => { ... })
onMounted(() => { ... })
onUpdated(() => { ... })- 라이프사이클의 우선순위를 수정하고 싶다면, 룰 세부 설정을 수정해보자.
// eslint.config.js

export default [
  {
    files: ["**/*.vue"],
    plugins: { "vue3-script-setup": vueSetupRules },
    rules: {
      "vue3-script-setup/declaration-order": [
        "error",
        {
          lifecycleOrder: { onMounted: 0, onBeforeMount: 1 } /* 여기!! */
        },
      ],
    },
  },
];
2) 적용 예시 보기
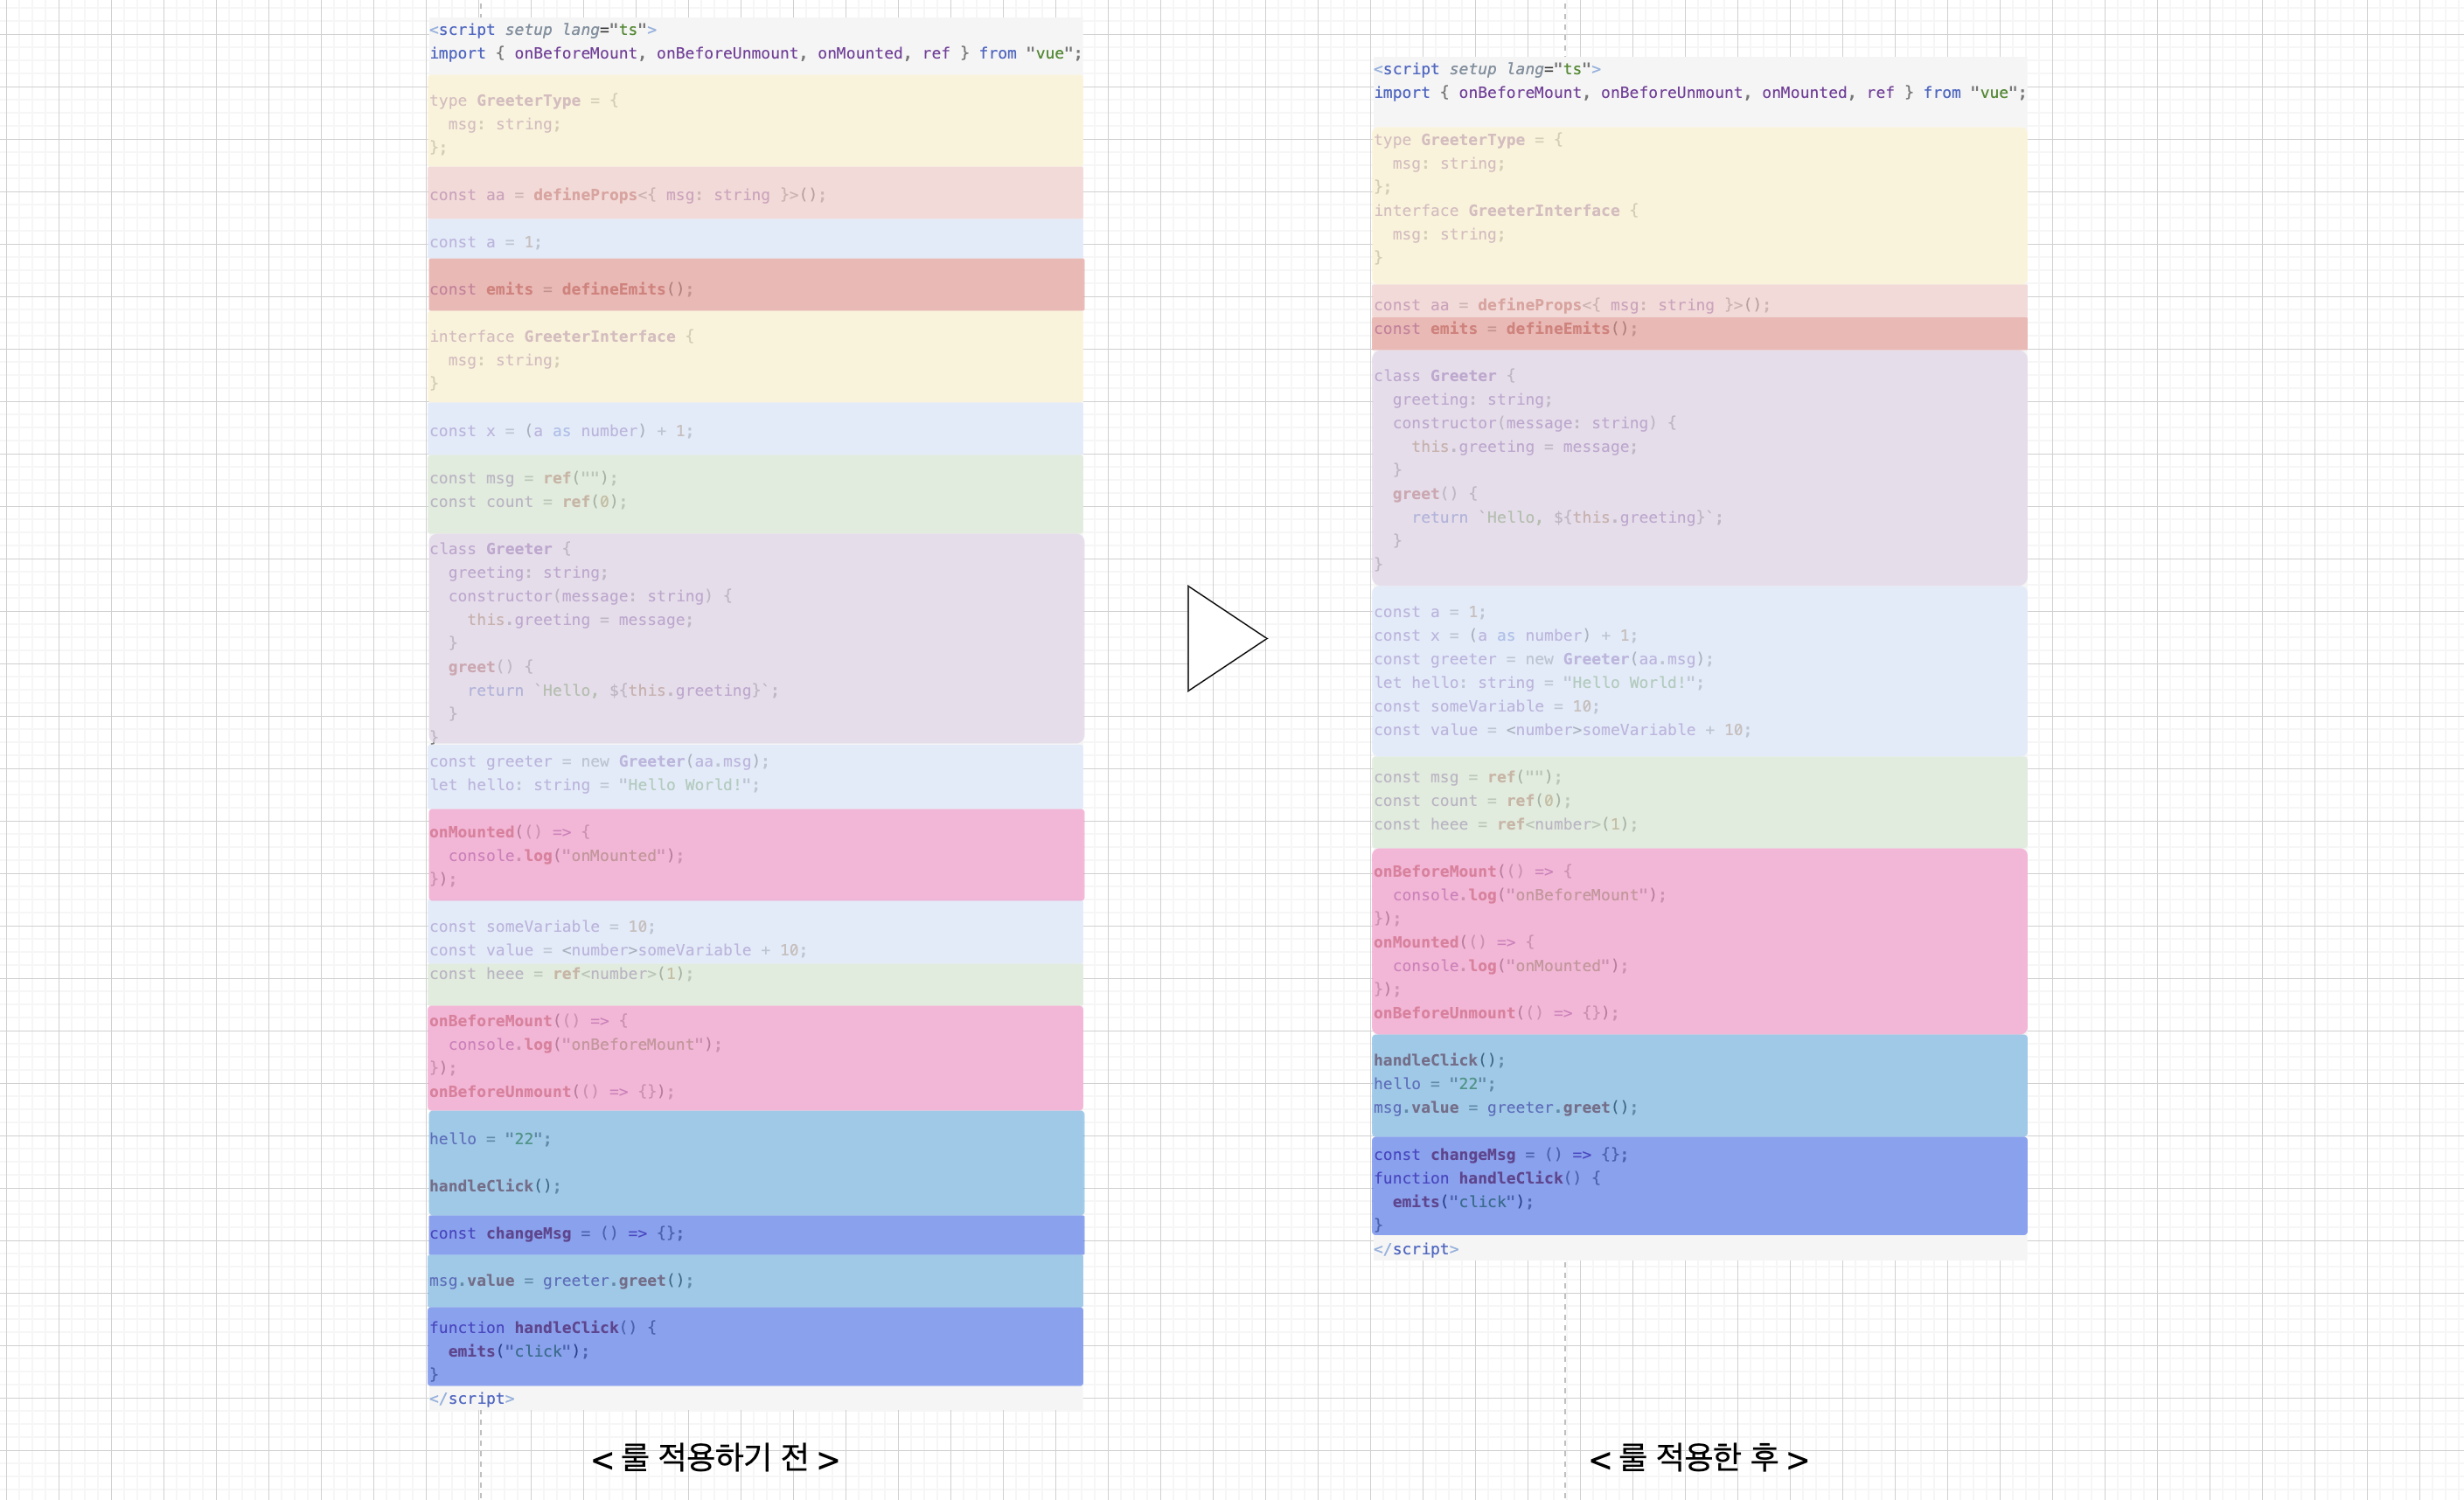
앞서 구현한 룰을 적용하고,
npx eslint . --fix명령어 실행시 순서가 자동 정렬된다.
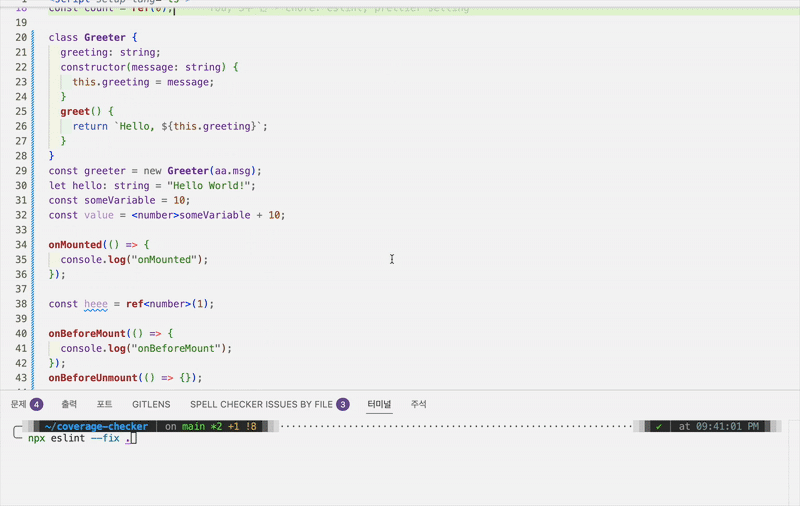
- 각 그룹을 색깔로 구분해보면, 정렬 후에 선언이 그룹별로 모여있는 걸 알 수 있다.
2. 커스텀 ESLint 룰 세부 구현 살펴보기
그럼 이 커스텀 eslint 룰은 어떻게 구현했을까? 세부 구현 코드를 살펴보았다. (구현 코드 보기)
1) 파일 구조
- 커스텀 ESLint 룰은 여러 파일로 모듈화했다.
- 각 모듈을 역할별로 분리해, 기능을 수정하거나 확장할 때 전체코드의 영향도를 낮췄다.
lib
├─ constants.js             /* 기본 상수 및 순서 정의 */
├─ rules
│  └─ declaration-order.js  /* 메인 ESLint 룰 구현 */
└─ utils
   ├─ astUtils.js           /* AST 분석 및 유틸리티 함수 */
└─ orderUtils.js /* 노드 정렬, 그룹화, 텍스트 생성 로직 */| 파일명 | 역할 |
|---|---|
| constants.js | DEFAULT_SECTION_ORDER와 DEFAULT_LIFECYCLE_ORDER를 정의하여 룰의 기본 순서를 설정한다. |
| astUtils.js | 노드를 분석하고, 타입 캐스팅을 풀거나 각 노드의 섹션(그룹)을 추출하는 등의 기능을 제공한다. |
| orderUtils.js | 노드를 정렬 및 그룹화하고, 최종으로 수정될 텍스트를 생성하는 로직을 담당한다. |
| declaration-order.js | 룰의 메인 파일로, 옵션을 처리하고 각 유틸리티 함수를 호출하여 자동 수정(fix) 로직을 실행한다. |
2) AST 유틸리티 (astUtils.js)
astUtils.js는 AST 노드를 분석하고 분류할 때 필요한 여러 유틸리티 함수를
모아놓은 모듈이다. (전체 코드 보기)
/* AST 노드를 분석하여, 해당 노드가 어떤 선언 그룹(섹션)에 속하는지 판단 */
export function getSection(node) { ... }

/* TypeScript 타입 단언 노드를 재귀적으로 풀어내어 최종적으로 내부 표현식을 반환 */
export function unwrapTypeCast(node) { ... }

/* CallExpression의 호출자 이름(calleeName)을 받아, 해당 이름에 따라 선언이 속할 그룹을 반환 */
export function getCallExpressionSection(calleeName) { ... }

/*  AST 노드에서 Vue 라이프사이클 훅의 이름을 추출 */
export function extractLifecycleHookName(node) { ... }

/* 사용자가 옵션으로 전달한 sectionOrder 배열이 유효한지 확인 */
export function validateSectionOrder(sectionOrder) { ... }
(1) unwrapTypeCast 함수 살펴보기
- TypeScript의 타입 단언 노드(
TSAsExpression,TSTypeAssertion)를 재귀적으로 해제하여, 내부의 표현식(예: Identifier)을 반환한다. - 만약 vue TypeScript 모드에서 타입 단언을 사용한 경우, AST에서는 value의 초기값이 래핑된다.
- 그래서 코드에
unwrapTypeCast()를 적용해 래퍼를 제거해야, Identifier(someVar)를 얻을 수 있다.
const value = (<number>someVar) + 1;
unwrapTypeCast()내부 로직을 살펴보자.
export function unwrapTypeCast(node) {
  const isTSNode = (n) =>
    n.type === "TSAsExpression" || n.type === "TSTypeAssertion";

  while (node && isTSNode(node)) {
    node = node.expression;
  }
  return node;
}isTSNode함수는 노드가TSAsExpression또는TSTypeAssertion인지 확인한다.- while 루프를 사용해, 래퍼가 감싸져 있다면 내부의 표현식으로 node를 업데이트하고, 최종으로 실제 값에 해당하는 노드를 반환한다.
(2) getSection 함수 살펴보기
- AST 노드를 분석하여, 해당 노드가 어떤 선언 그룹(섹션)에 속하는지 결정하는 함수이다.
- ImportDeclaration은 제외하고, 각 노드 타입에 따라 "class", "type", "functions" 등의 그룹을 반환한다.
- 예를 들어, 아래 변수 선언은 AST에서 plainVars 또는 functions 그룹으로 분류된다.
const x = 10;               // => "plainVars"
const fn = () => {}; // => "functions"getSection()로직을 그림으로 표현하면 다음과 같다.
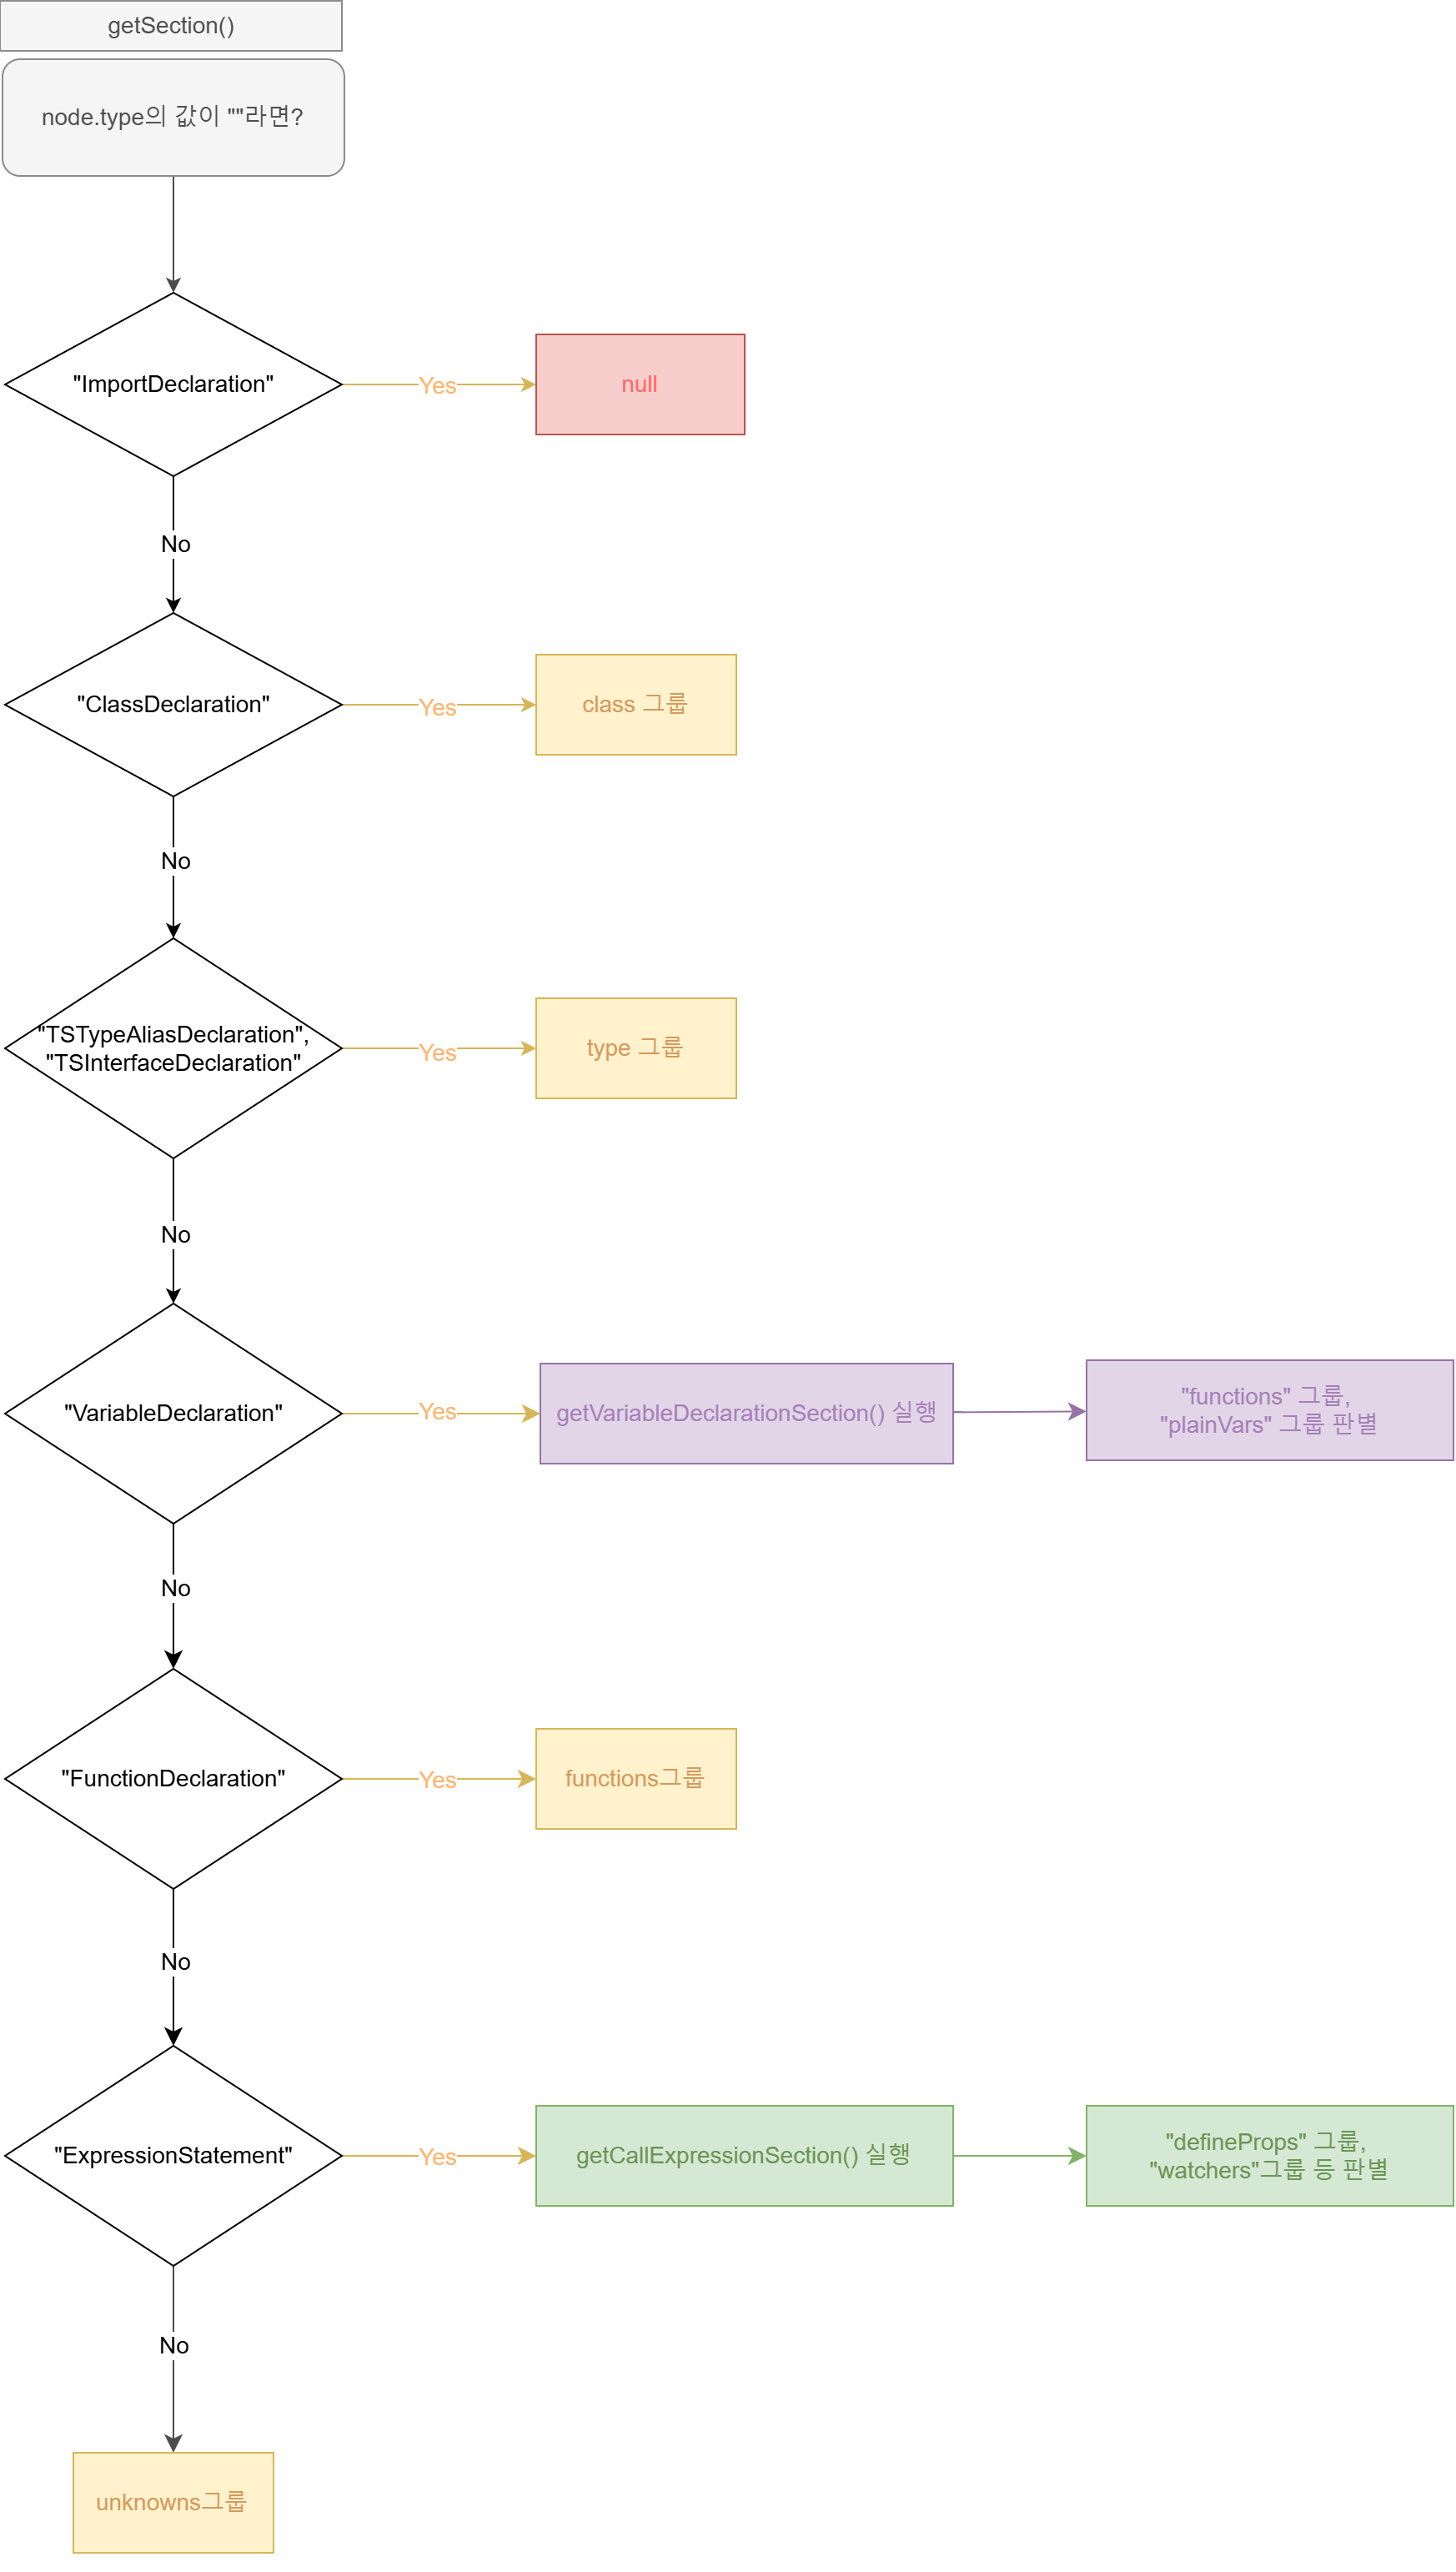
getSection()내부 코드를 살펴보자!
export function getSection(node) {
  switch (node.type) {
    case "ImportDeclaration":
      return null;
    case "ClassDeclaration":
      return "class";
    case "TSTypeAliasDeclaration":
    case "TSInterfaceDeclaration":
      return "type";
    case "VariableDeclaration":
      return getVariableDeclarationSection(node);
    case "FunctionDeclaration":
      return "functions";
    case "ExpressionStatement":
      if (isCallExpression(node.expression)) {
        const section = getCallExpressionSection(node.expression.callee.name);
        if (section) return section;
      }
      return "unknowns";
    default:
      return "unknowns";
  }
}getSection()은switch문을 사용해 노드 타입에 따라 그룹을 분류한다.- 변수 선언의 경우, 별도의 헬퍼 함수
getVariableDeclarationSection()으로 내부 초기값을 분석해, 함수 표현식이면 "functions"를
그렇지 않으면 "plainVars"를 반환한다. - 만약 CallExpression인 경우에는
getCallExpressionSection을 호출하여 세부 그룹을 결정한다.
(2-1) getVariableDeclarationSection 함수 살펴보기
- 변수 선언 노드의 초기값을 분석해, 선언 그룹을 결정하는 함수이다.
getVariableDeclarationSection()를 사용하면, 변수 선언이 “functions”인지 “plainVars”인지 판별할 수 있다.
// 함수 표현식이므로 "functions"로 분류됨
const myFunc = () => { ... };

// 일반 변수 선언은 "plainVars"로 분류됨
const myVar = 123;
getVariableDeclarationSection()내부 로직을 살펴보면…
function getVariableDeclarationSection(node) {
  const declaration = node.declarations[0];

  if (declaration && declaration.init) {
    const initNode = unwrapTypeCast(declaration.init);

    if (
      initNode.type === "FunctionExpression" ||
      initNode.type === "ArrowFunctionExpression"
    ) {
      return "functions";          // (a)
    } else if (isCallExpression(initNode)) {
      const section = getCallExpressionSection(initNode.callee.name);
      if (section) return section; // (b)
    }
  }
  return "plainVars";              // (c)
}- 첫 번째 선언의 초기값이 함수 표현식이면 "functions"그룹이 된다. (a)
- 하지만 만약 초기값이 CallExpression이면
getCallExpressionSection()를 호출해 호출자 이름에 따라 세부 그룹을 결정한다. (b) - 그 이외의 케이스에는 "plainVars"그룹으로 간주한다. (c)
(3) getCallExpressionSection 함수 살펴보기
- CallExpression의 호출자 이름(calleeName)을 기준으로, 해당 선언이 어떤 그룹에 속하는지 분류한다.
- 아래 그림을 보면 알 수 있듯이, calleeName 값이 defineProps면 ”defineProps”그룹으로 분류한다.
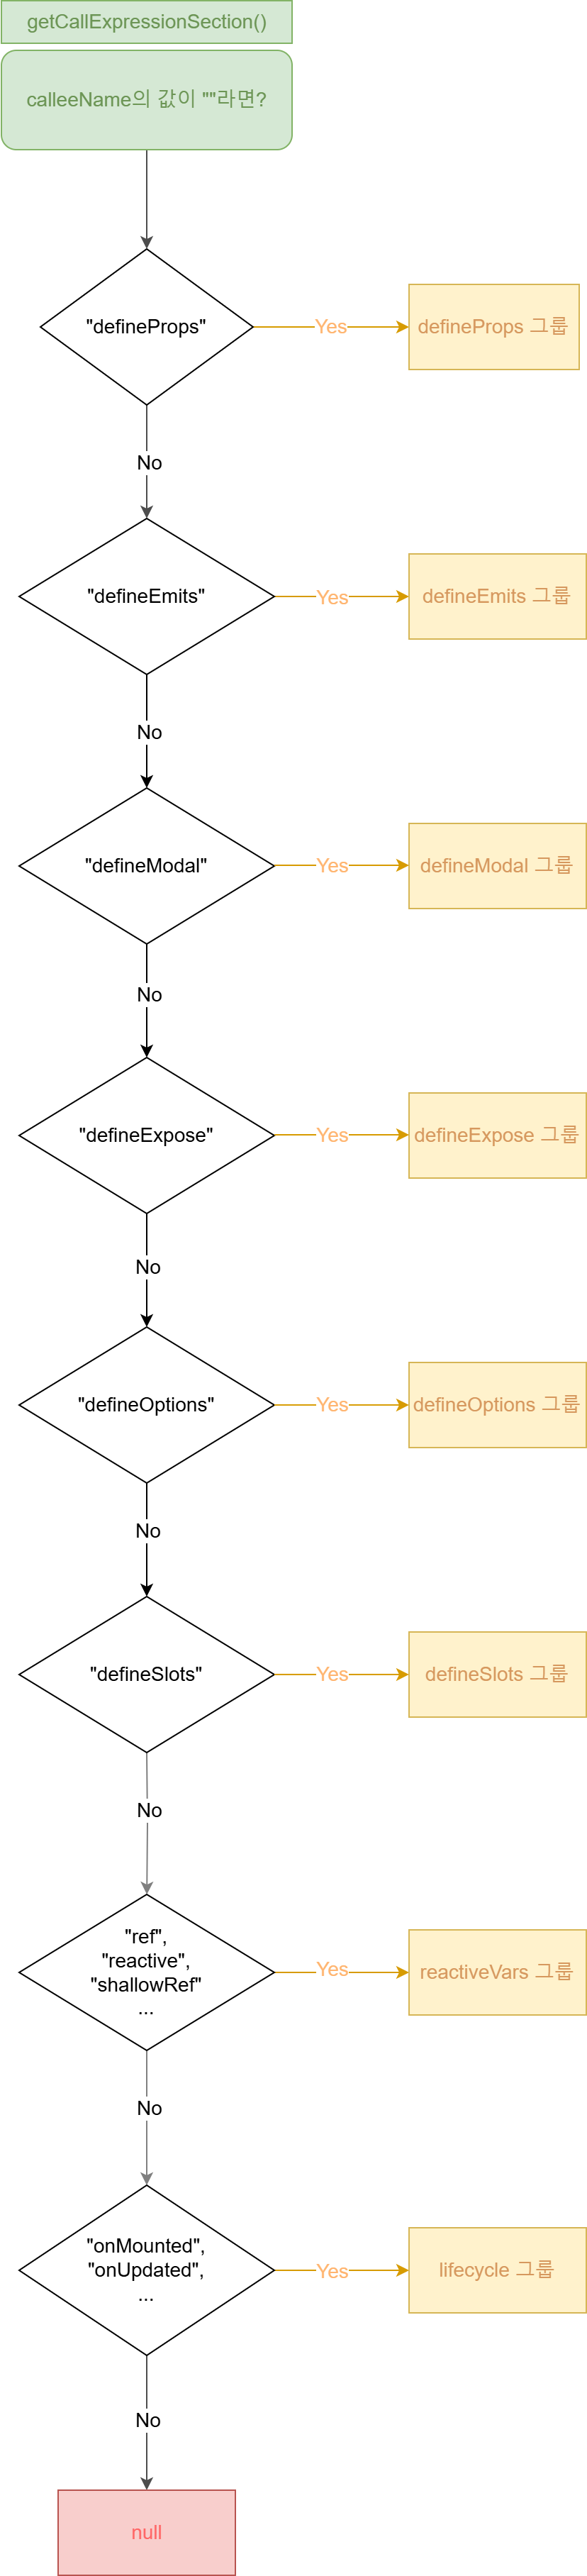
getCallExpressionSection()내부 로직을 살펴보면…
export function getCallExpressionSection(calleeName) {
  if (calleeName === "defineProps") return "defineProps";
  if (calleeName === "defineEmits") return "defineEmits";
  if (calleeName === "defineExpose") return "defineExpose";
  if (calleeName === "defineSlots") return "defineSlots";
  if (calleeName === "defineModel") return "defineModel";
  if (calleeName === "defineOptions") return "defineOptions";
  if (DECLARE_LIST.includes(calleeName)) return "reactiveVars";
  if (calleeName.startsWith("use")) return "composables";
  if (calleeName === "computed") return "computed";
  if (calleeName === "watch") return "watchers";
  if (LIFECYCLE_LIST.includes(calleeName)) return "lifecycle";

  return null;
}calleeName이 "defineProps", "defineEmits", "computed", "watch"이면 해당 문자열을 그대로 반환한다.calleeName이 "use"로 시작하면 "composables"로 분류한다.- 선언 목록(
DECLARE_LIST)에 포함되면, “reactiveVars”로 분류한다. - 라이프사이클 목록(
LIFECYCLE_LIST)에 포함되면 "lifecycle"로 분류한다.
(4) extractLifecycleHookName 함수 살펴보기
- AST 노드에서 Vue 라이프사이클 훅 이름을 반환하는 함수이다.
- 아래 코드는
onMounted훅을 호출하는 코드이다. - 만약
extractLifecycleHookName()를 실행하게 되면, "onMounted"라는 문자열을 리턴하게 된다.
onMounted(() => { console.log("mounted"); }); /* onMounted 그룹 */
extractLifecycleHookName()내부 로직을 살펴보자!
export function extractLifecycleHookName(node) {
  if (node.type === "VariableDeclaration") {
    const declaration = node.declarations[0];

    if (declaration && declaration.init) {
      const initNode = unwrapTypeCast(declaration.init);
      return isCallExpression(initNode) ? initNode.callee.name : null;
    }
  } else if (node.type === "ExpressionStatement") {
    return isCallExpression(node.expression) ? node.expression.callee.name : null;
  } else {
    return null;
  }
}- 변수 선언이나 표현식 문에서 CallExpression의 호출자 이름을 반환한다.
- 라이프사이클 훅의 경우, 호출자 이름("onMounted")을 반환한다.
(5) validateSectionOrder 함수 살펴보기
- 사용자가 지정한
sectionOrder옵션이 올바른 값인지 확인힌다.
// 올바른 경우: 기본 배열과 동일하거나, 유효한 문자열만 포함되어 있음

validateSectionOrder(["type", "defineProps", "plainVars"]);
// 잘못된 경우: 숫자나 정의되지 않은 문자열을 포함하면 오류 발생
validateSectionOrder(["type", 123, "foo"]); // 오류 발생
validateSectionOrder()내부 로직을 살펴보면...
- 코드를 보면 알 수 있듯이, 옵션값의 타입이나 그룹값이 유효한지 검증하는 걸 알 수 있다.
export function validateSectionOrder(sectionOrder) {
  if (!Array.isArray(sectionOrder)) {
    throw new Error(
      `Invalid "sectionOrder" option: Expected an array, but received ${typeof sectionOrder}.`
    );
  }

  for (const section of sectionOrder) {
    if (typeof section !== "string") {
      throw new Error(
        `Invalid "sectionOrder" option: Expected string values, but found ${typeof section}.`
      );
    }
    if (!DEFAULT_SECTION_ORDER.includes(section)) {
      throw new Error(
        `Invalid "sectionOrder" option: "${section}" is not a recognized section. Valid sections: ${DEFAULT_SECTION_ORDER.join(", ")}`
      );
    }
  }
}
3) AST 유틸리티 (orderUtils.js)
orderUtils.js는 선언된 코드들을 사용자가 지정한 순서(예: sectionOrder, lifecycleOrder)에 따라 정렬된 코드를 만드는 역할을 한다. (전체코드 보기)
/* AST 노드를 분석하여 해당 노드의 그룹, 정렬 인덱스, 원본 텍스트를 반환 */
export function createNodeWithSection(node) { ... }

/* 주어진 lifecycleOrder 옵션에 따라 노드의 라이프사이클 정렬 인덱스를 계산 */
export function getLifecycleSortIndex(node) { ... }

/* 노드를 sectionOrder에 따라 정렬하며, 라이프사이클 노드는 추가 정렬 인덱스로 정렬 */
export function sortNodes(nodesWithSection) { ... }

/* 정렬된 노드들을 그룹별로 묶고, 각 그룹의 소스 코드 범위를 기록 */
export function groupNodes(sortedNodes) { ... }

/* 그룹별로 노드 텍스트를 결합하여 최종 정렬된 소스 코드를 생성 */
export function generateSortedText(groups, sourceCode) { ... }

/* 여러 개의 빈 줄을 단일 newline으로 축소하고 좌우 공백을 제거 */
export function normalizeNewlines(text) { ... }
(1) createNodeWithSection 함수
createNodeWithSection함수는 AST 노드가 속하는 선언 그룹(섹션)과 정렬을 위한 인덱스를 부여한다.- 만약 사용자가 전달한
sectionOrder배열에 해당 섹션이 있다면 그 순서 인덱스를, 없으면 마지막 순서로 취급한다. - 하지만 노드가 라이프사이클(lifecycle) 그룹에 속한 경우, 라이프 사이클 순서 인덱스(
lifecycleSortIndex)를 계산한다.
구현 코드를 살펴보면…
export function createNodeWithSection({
  node,
  index,
  sourceCode,
  sectionOrder,
  lifecycleOrder,
}) {
  const section = getSection(node); // AST 노드를 분석해 선언 그룹을 결정
  const text = sourceCode.getText(node); // 해당 노드의 원본 소스 텍스트 추출
  const idx = sectionOrder.indexOf(section);
  const sortIndex = idx !== -1 ? idx : sectionOrder.length;

  // 라이프사이클 그룹인 경우 추가 인덱스 부여
  const lifecycleSortIndex =
    section === "lifecycle" ? getLifecycleSortIndex(node, lifecycleOrder) : null;

  return { node, index, section, sortIndex, text, lifecycleSortIndex };
}getSection과extractLifecycleHookName로 노드의 그룹과 라이프사이클 훅 이름을 결정한다.- 그 다음,
sectionOrder에 따라 정렬 인덱스를 부여한다. - 단, 라이프사이클 노드의 경우
lifecycleOrder옵션을 참고하여 추가 정렬 인덱스를 계산한다.
(2) getLifecycleSortIndex 함수
getLifecycleSortIndex함수는 라이프사이클 노드의 우선순위를 반환한다.
function getLifecycleSortIndex(node, lifecycleOrder) {
  const hookName = extractLifecycleHookName(node);
  const hasHookName = hookName && lifecycleOrder.hasOwnProperty(hookName);

  return hasHookName ? lifecycleOrder[hookName] : Object.keys(lifecycleOrder).length;
}
(3) sortNodes 함수
sortNodes함수는 노드 정보 배열을 정렬한다.- 우선, 각 노드의
sortIndex(즉, 사용자 지정sectionOrder에 따른 순서)를 기준으로 정렬한다. - 만약 두 노드가 모두
lifecycle그룹에 속하면,lifecycleSortIndex로 비교하여 정렬한다.
export function sortNodes(nodesWithSection) {
  return nodesWithSection.slice().sort((a, b) => {
    // 1. sectionOrder 순서에 따라 정렬
    if (a.sortIndex !== b.sortIndex) {
      return a.sortIndex - b.sortIndex;
    }

    // 2. 둘 다 lifecycle 그룹이면 lifecycleSortIndex 값을 기준으로 추가 정렬
    if (a.section === "lifecycle" && b.section === "lifecycle") {
      const aLifecycleSortIndex = typeof a.lifecycleSortIndex === "number" ? a.lifecycleSortIndex : Infinity;
      const bLifecycleSortIndex = typeof b.lifecycleSortIndex === "number" ? b.lifecycleSortIndex : Infinity;
      if (aLifecycleSortIndex !== bLifecycleSortIndex) {
        return aLifecycleSortIndex - bLifecycleSortIndex;
      }
    }

    // 3. 그 외에는 원래 입력 순서 유지
    return a.index - b.index;
  });
}
(4) groupNodes 함수
groupNodes함수는 정렬된 노드들을 그룹별로 묶는다.- 같은 그룹에 속하는 노드들을 한 배열로 모으고, 다른 그룹이면 새 그룹을 추가한다.
export function groupNodes(sortedNodes) {
  if (sortedNodes.length === 0) return [];

  const groups = [];
  let currentGroup = [sortedNodes[0]];
  let currentGroupName = groupName(sortedNodes[0].section);

  for (let i = 1; i < sortedNodes.length; i++) {
    const item = sortedNodes[i];
    const itemGroupName = groupName(item.section);
    const isSameGroup = itemGroupName === currentGroupName;

    if (isSameGroup) {
      currentGroup.push(item);
    } else {
      groups.push({ group: currentGroupName, items: currentGroup });
      currentGroup = [item];
      currentGroupName = itemGroupName;
    }
  }
  groups.push({
    group: currentGroupName,
    items: currentGroup,
  });

  return groups;
}- 초기값을 첫 번째 노드로 설정한 후, for 루프를 통해 각 노드를 검사한다.
- 그룹이 다르다면, 현재 그룹을 groups 배열에 추가하고 새 그룹 데이터를 적재한다.
(5) generateSortedText & normalizeNewlines 함수
generateSortedText함수는 그룹 노드의 텍스트를 결합하여 최종 수정할 소스 코드를 생성한다.- 그룹 노드의 텍스트는 줄바꿈으로 연결하고,
normalizeNewlines함수를 적용해 불필요한 빈 줄을 제거한다.
export function generateSortedText(groups) {
  function getGroupText(group) {
    /* 그룹 내의 노드끼리는 줄바꿈 1번 */
    const text = group.items.map((item) => item.text).join("\n");
    return normalizeNewlines(text);
  }

  /* 그룹 간에는 줄바꿈 2번해서, 그룹 간 구분이 쉽도록 공간을 추가함 */
  return groups.map(getGroupText).join("\n\n");
}
export function normalizeNewlines(text) {
/* 여러 개의 빈 줄을 단일 newline으로 치환하고 좌우 공백 제거 */
return text.replace(/\n\s*\n/g, "\n").trim();
}4) 메인 함수(rules/declaration-order.js)
- 앞서 선언한 함수를 조합하여, ESLint 룰을 정의했다. (구현 코드 보러가기)
- ESLint 룰 형식은 다음과 같은데, 각각의 역할을 우선 살펴보자.
export default {
  meta: {
    type: "layout",
    docs: { ... },
    fixable: "code",
    schema: [ ... ],
  },
  create(context) { ... };
  },
};- type: 이 룰이 다루는 문제 유형(예: layout, problem 등)을 나타낸다.
| 타입 종류 | 설명 |
|---|---|
| problem | - 코드의 잠재적인 버그나 오류를 나타낸다. - 실제 문제를 야기할 수 있는 코딩 실수를 경고하는 타입이다. |
| suggestion | - 반드시 수정해야 하는 오류는 아니지만, 더 나은 코드 스타일이나 관례를 제안하는 경우이다. |
| layout | - 코드 포매팅, 들여쓰기, 줄바꿈 등 스타일 관련 이슈를 다룬다. - 자동 수정(fix) 기능으로 코드의 레이아웃을 일관되게 만들어 준다. |
- docs: 룰에 대한 설명, 카테고리, 추천 여부 등 문서화를 위한 정보를 작성한다.
- fixable: 이 룰이 자동 수정(fix)을 지원하는지 여부를 나타낸다.
| fixable 종류 | 설명 |
|---|---|
| code | 코드의 논리나 구조를 변경하는 등, 자동 수정 기능을 지원한다. |
| whitespace | 들여쓰기, 줄바꿈 등 공백 관련 포매팅만 수정하는 경우에 사용한다. |
- schema: 사용자가 옵션을 전달할 때 기대하는 데이터 구조와 타입을 정의한다.
- create: 소스 코드를 분석하여, 수정이 필요한 경우 자동 수정(fix)하는 로직을 구현한다.
그럼 현재 구현한 룰은 어떤 설정을 했을까?
- 해당 ESLint 룰은 선언 순서를 자동 조정하는 룰이므로, 타입(type)은
layout, fixable는code로 설정했다. - 제공하는 옵션은
sectionOrder,lifecycleOrder로, 스키마(schema)에 옵션의 타입을 명시해주었다.
import { DEFAULT_SECTION_ORDER, DEFAULT_LIFECYCLE_ORDER } from "../constants.js"
import { createNodeWithSection, sortNodes, groupNodes, generateSortedText } from "../utils/orderUtils.js"
import { validateSectionOrder } from "../utils/astUtils.js"

export default {
  meta: {
    type: "layout",
    docs: {
      description: `Vue 3 <script setup>에서 선언 순서를 강제합니다.`,
      category: "Stylistic Issues",
      recommended: true,
    },
    fixable: "code",
    schema: [
      {
        type: "object",
        properties: {
          sectionOrder: {
            type: "array",
            items: { type: "string" },
          },
          lifecycleOrder: {
            type: "object",
            additionalProperties: { type: "number" },
          },
        },
        additionalProperties: false,
      },
    ],
  },
  create(context) { ... },
};- 그리고 선언 순서가 옵션값과 다를 때 자동 정렬이 되도록,
create함수에서 정렬된 구문을 리턴해 주었다. - 만약 코드 동작이 궁금하다면, 아래 주석을 살펴보자!
import { DEFAULT_SECTION_ORDER, DEFAULT_LIFECYCLE_ORDER } from "../constants.js"
import { createNodeWithSection, sortNodes, groupNodes, generateSortedText } from "../utils/orderUtils.js"
import { validateSectionOrder } from "../utils/astUtils.js"

export default {
  meta: { ... },
    fixable: "code",
    schema: [ ... ],
  },
  create(context) {
    /* 사용자가 지정한 옵션값 가져오고, 만약 지정하지 않았다면 기본 옵션값을 사용함 */
    const options = context.options[0] || {};
    const sectionOrder = options.sectionOrder || DEFAULT_SECTION_ORDER;
    const lifecycleOrder = options.lifecycleOrder || DEFAULT_LIFECYCLE_ORDER;

    /* sectionOrder 값이 올바른지 확인 */
    validateSectionOrder(sectionOrder);

    return {
      "Program:exit"(node) {
        /* 현재 소스 코드 가져오기 */
        const sourceCode = context.getSourceCode();

        /* ImportDeclaration은 제와한 구문을 가져옴 */
        const nonImportNodes = node.body.filter(
          (child) => child.type !== "ImportDeclaration",
        );
        if (nonImportNodes.length === 0) return;

        /* 각 노드별 섹션값을 구함 */
        const nodesWithSection = nonImportNodes.map((child, index) =>
          createNodeWithSection({
            node: child,
            index,
            sourceCode,
            sectionOrder,
            lifecycleOrder,
          }),
        );

        const sortedNodes = sortNodes(nodesWithSection);
        const groups = groupNodes(sortedNodes);
        const sortedText = generateSortedText(groups);
        const fixRange = [
          nonImportNodes[0].range[0],
          nonImportNodes[nonImportNodes.length - 1].range[1],
        ];
        const originalText = sourceCode.text.slice(fixRange[0], fixRange[1]);

        /* 기존 구문과 정렬된 구문이 같다면, 순서를 재정렬하지 않음 */
        if (originalText === sortedText) return;

        /* 기존 구문과 정렬된 구문이 다르다면, 에러 메시지를 보여줌
          만약 eslint fix 명령어를 사용하게 되면 순서가 재정렬함 */
        context.report({
          node: nonImportNodes[0],
          message:
            "Vue 3 <script setup> 내 선언 순서가 올바르지 않습니다. 자동 수정(fix)을 적용합니다.",
          fix(fixer) {
            return fixer.replaceTextRange(fixRange, sortedText);
          },
        });
      },
    };
  },
};
3. 마치며…
이번 시간에는 Vue 3 <script setup> 내 선언 순서를 자동으로 정렬해 주는 커스텀 ESLint 룰을 살펴보았다. 이 룰은 코드 작성 시 선언 순서를 자동으로 재배치하여, 모든 개발자가 일관된 스타일로 코드를 작성할 수 있도록 도와준다.
이 자동 정렬 기능은 단순히 코드 포매팅 문제를 해결하는 것에 그치지 않고, 코드 리뷰 과정에서 불필요한 포매팅 논쟁을 줄이는 데에도 기여한다. 현재 이 ESLint 룰은 초기 버전이지만, 테스트 기간 동안 팀의 피드백을 반영하여 다양한 옵션과 기능을 추가할 계획이다. 예를 들어, 보다 세밀한 선언 순서 옵션을 도입하거나 특정 상황에 맞춰 라이프사이클 훅의 우선순위를 조정하는 등의 개선이 가능하다.
더 나아가, ESLint 룰을 커스텀하면 서비스에서 지원하지 않는 최신 문법을 감지해 에러를 발생시키거나, 팀 컨벤션에 어긋나는 변수 선언 방식 및 코드 패턴을 자동으로 관리하는 등의 방식으로 코드 품질을 일정하게 유지할 수 있다. 이를 통해 개발자들은 코드 스타일을 반복적으로 확인하는 부담을 줄이고, 기능 개발과 기술적인 논의에 더욱 집중할 수 있는 환경을 구축할 수 있을 것이다.
'개발 기술 > 개발 이야기' 카테고리의 다른 글
| [CSS] SPA에서 Global과 Split CSS, 두 장점을 모두 살리는 방법 (0) | 2025.04.27 |
|---|---|
| 테스트 코드를 관리하는 법 2: 커버리지 감소 검사하기 (0) | 2025.01.24 |
| 테스트 코드를 관리하는 법 1, Pre-Push 단계에서 테스트 자동화하기 (0) | 2025.01.01 |
| 아이콘 컴포넌트 렌더링 방식, 정말 좋을까? (with. 빌드 시간, FID, TBT 등 비교) (0) | 2024.08.11 |
| [JS/CSS] corner smoothing을 구현하는 법(feat. 부드러운 둥근 모서리) (0) | 2024.06.18 |


댓글